

I love crafting and science mashups, don’t you?
So does my (recently retired) dad. Remember when he helped me out with the DIY shrinky dinks? Well… the mad scientist chemical engineer is at it again. But this time, he wasn’t interested in crafting with ME as much as he was the grandkids.

Those precious faces, can you blame him? So I was pretty much just there to take the photos.
See… Dad’s a busy person at heart (must be where I get it from), so when his Sweetheart wanted to keep a cool whisky bottle to display, he thought – as most chemical engineers would – “Why don’t we make it look like there’s still whisky in it?”
So he did. See?


I was intrigued. Possibly more so than the Cupcake.
The project required a Grandpa-sponsored field trip to Hobby Lobby where he had the kids pick out flowers and a vase. My nephew had eyes only for orange and white florals so he could give his to his mama who loves the Tennessee Volunteers.

I steered the willing Cupcake towards a more neutral palette.

Once back at home, we gathered our supplies so Grandpa could show them how to stir up the magic. Pun intended.

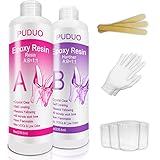
He used these things:
Clear polyester casting resin and an activator which is included. See in the cap? (Links to order this stuff at the end.)

He also used a colorant shown above on left. If you want to make the water whisky-colored like in the first photo, you’ll want to use a colorant with an amber tint, however there are other colors as well.

It’s also wise to have rubber gloves, a wooden stir stick, an old plastic container, and some newspaper, paper towels, and some old plastic party flutes to use as a funnel (cut the bottom off) and to hold your flowers in place.


DO THIS OUTSIDE
Put your newspapers down on your work area and your gloves on.

Measure and trim your flowers. Make sure they are the length you want them to be in the vase.

Stick them in the vase to make sure they are the right height.

Following the instructions on the bottle, pour your desired amount of casting resin into the plastic tub.


Add 2 to 3 drops of colorant per ounce of resin.

Add in the activator. This is where it gets a little sciency. This is what the eplastics.com recommends.

If you use too much catalyst, your project will cure more quickly, but if you use too much, your glass may fracture. Cold outside temperatures, the amount of colorant used, and a deep depth of the casting will slow down the catalyst.
So now that you’re totally comfortable with that guessing game. Move onto stirring with your wooden stick until well blended.

Pour into your vase. We decided not to use the funnel, but for smaller openings, you’ll definitely need to use one.


Wipe off any excess off the sides.
Add your flowers.


You may want to put something around your flowers to hold them exactly where you want them. Once you’re happy, don’t move it at all.

The resin will heat up and cool down as it goes through several stages. First it will convert to a soft gel stage, then a firm gel stage, and finally a “click hard” stage. It will be cured in anywhere between 1 – 24 hours, depending on the thickness of the resin and how much catalyst was added. It’s really neat to feel the warm glass as the chemicals begin to react and harden. That’s the fun part!
To be safe, we left these alone in the garage for 24 hours.
Once cool, you’re all set. Literally!

And here’s where me and sweetheart took over for Grandpa. We raided her ribbon stash and prettied them up a little.

I absolutely LOVE it, even though I accidentally covered up the water line. Ooops.
And in the off chance you’re wondering, you CAN get one of these finished projects through TSA security but you WILL be subject to a bomb scan – even though it’s rock solid. And… they’re heavy so if you’re travelling with your gorgeous project like we were, plan ahead!
I can’t wait to see what his next mash-up will be! Thanks Dad!


Ask Dad
A girl always needs her Dad, right? My retired professor of chemical engineering father is super helpful and explains things we all have questions for. There are quite a few posts where he weighs in. Look for his cute photo for sciencey insight from Dr. John!
See more Ask Dad posts:
DIY Shrinky Dinks
How to Make Fake Water
How to Make Colored Wooden Bead Garlands
What is in Piggy Polish and is it really safe?
The Science Behind Baking Soda & Paint Textured Clay Effect
 What’s your happy place? Crafting? Cooking? Cocktails? Party planning? Yes please! I love it all, and I’ve tried a lot. Check out my how-to’s! What should we do next?


Absolutely love this!!!!! Great job to all!!
I need your advice. Pretend it’s not weird for a second, but picture a bucket of peanut shells, like at Texas Roadhouse…
Would you pour the resin over the shells, or put the resin in the bucket first, then add shells?
Okay, that’s a new one but I love the idea! I think you’ll have to put the shells in first and maybe even leave the peanuts in the shell so they don’t all float to the top.
I’d definitely do a small sample run in a dollar store glass jar to see if they float to the top or not.
Hello, I have approximately 73 medium-sized floral arragements that will be for Mother’s Day. How much artificial water will I need? Thanks!
A LOT! It will all depend on the size of the vessel and how deep you’re making them. Also, note that may get pretty pricey. You might want to look into a wholesale option or bulk discount.
Mine turned yellow after a while. Is there any why to clean it?
Really? I’m not sure. Mine hasn’t changed color. Was it exposed to heat or sunlight maybe?
Hi I am trying to figure out how best to clean a store-bought arrangement that turned yellow on top. I’ve had it for a while and clean the top as best I can but now it’s not so pretty.
What part turned yellow? The resin or the flowers?
Love this idea. I’ll be 80 the middle of Sept. and need something to do.
Love this idea but am confused about the amount of catalyst. If I make eight ounces of resin. How many drops of catalyst are used?
Thank you
It’s VERY confusing! It depends on how deep the resin is. Basically, I just winged it.
Hi me and my husband is making a fake outdoor pond would this product work? And can we use the black mold frame that goes around flower beds?
Oh gosh, that would be SO expensive! What size pond are you thinking of? I’m not sure if the mold would survive the high heat. It melts plastic. I would test a corner first!
i am a complete beginner. is there somewhere i could buy this locally. the area staines upon thames middlesex.
Yikes, I WISH I could recommend an area near you. How about Amazon.com?
The Panacea Decorative Accents Crystal Clear Floral Setting Resin located with the vases in the craft stores does the same thing but it does not heat and cool. I have experienced zero cracked glasses or melted plastic cups. There is no odor and it is a 1:1 ratio so it takes any catalyst guess work out of the equation. I have colored it with drops of acrylic paint and it worked well.
Cool! I’m going to check that out!
I’m trying to make a submerged silk flower centerpiece, inspired by the Beauty and the Beast Rose, for my up coming wedding. I’m wondering if you have any tips on which resin to use and if I can mix a “pixie dust” fine glitter in the resin without it settling at the top or bottom of the jar. Or if you have any other ideas of what I can use.
Any tips or suggestions are greatly appreciated!
I would definitely use the clear resin, don’t add any coloring. Try a test with some resin and glitter first in a cheap jar just to see if it will keep from settling.
Thank you for the how-to! I am considering using this as liquid in an environment I am creating for an “alien” critter I purchased at bungledjungle.com The container in which I am creating the environment is an acrylic reptile habitat from a pet store. Do you know if the casting resin will chemically react to the acrylic or crack it?
I can’t say for sure, but I know I melted a few plastic solo cups when I left them coated with resin overnight.
I like your
The way it turned out however I was wondering, I wanted to make it look like diamonds floating all around in the vase. How would I do that.?
Could I put a electric cord in the vase if I want to make a lamp and then pour the gel in with people’s floating.?
I was thinking of adding some glitter to mine the next time I make it so you might try that. I haven’t tried it yet so I can’t say if the glitter will sink or float or stay mixed within though… I wouldn’t recommend putting an electric cord in the vase with the resin as it is solidifying.
Hello! I was wondering if the heat will crack/expand glass containers that are heat-resistant/proof? And how warm/hot will the mixture get?
Thank you so much for your lovely tutorial!
Yeah, so if you put too much catalyst in it, you do run the risk of cracking the glass when it expands. It will get warm to the touch but not like scalding hot — at least if you use the correct ratio. I discovered that it will melt a plastic drinking cup though, so maybe don’t use those to mix it. I did and found a huge mess the next morning. Oops.
Have you tried a color one yet? I can’t tell from the pictures how translucent the color is. I want fake margaritas for a headpiece.
I’ve seen my Dad make one with amber but I haven’t used a green. That would be REALLY cool though! And “fake margaritas for a headpiece” begs the question: Can I come to that party?
Hi Trista,
I bought some ready – made vases with flowers & resin. The level of the resin is too low, as I want to use them as book ends. If I add more, will it react with what’s already there (label on vase doesn’t say what it consists of)?
Your instruction is excellent. I don’t think it matters that the burlap on your arrangement covers the water line. It would in a living one.
I haven’t tried adding resin so I am not speaking from experience, BUT… I would think there would be a line where the two resins meet. My concern would be that the resin you’re adding to the top is a slightly different tint. If you’re tying a ribbon around it though, you could likely hide that.
I need to make a stream of water as if pouring from a small watering can into a pot. Therefore I need it to be sort of curved. I would make a rope type mold. Would this product work?
I think if you used a mold, yes. I would definitely try it.
can you color it? I want to make a fairy garden pool — blue. Got any suggestions?
Yes! You can. There are tints you can get. Personally, the next one I do I want to add glitter!
Is there a way to clean up any spillage on the vase walls?
I immediately wiped it with a paper towel but it’s difficult to remove. If I had been better prepared, I probably would have used a baby wipe or something with just a little moisture. The paper towel worked okay, but it’s difficult to get a natural looking edge to the resin edge.
Great article!
Question: Is the viscosity of the resin sufficiently low that it will spaces around glass “stones” that I plan to use at bottom of the cylinder?
As you insert the artificial flowers, do air bubbles “stick” to the stems as the resin solidifies?
Thanks
Hi Mark, t’s a pourable gel-isa consistency, but I haven’t found it to induce any air bubbles around the stems. Slow and steady is the key. It will certainly fill spaces in between the stones, but pour slowly so that you don’t dislodge the stones as you do. Otherwise you’ll be trying to replace them and you run the risk of getting the resin on the sides of the glass and that’s hard to remove.
I really liked the way your showed this project. I am excited to try it!
Thanks!
Thanks! Would love to see how yours turns out!
Hi, my name is Sam. I’m about to do a project using about 6 oz of casting resin for a fake potion bottle. I’ve heard using too much resin at once causes fractures, and since I won’t be able to reuse it I want to make sure it won’t crack.
I see you guys seem to have not done your project in layers, so I wanted to know if anything cracked at all? I know the label on the back says to use a certain amount per layer thickness or amount of layers, but honestly it kind of confuses me.
Can you please help, or link me to somewhere (if you know of anything) that explains it? I’m hoping to sell what I make so I don’t want anything too cracked from me not knowing what I’m doing.
Hi Sam,
Sorry I just saw your comment! The problem is actually the heat — it will expand the bottle and crack it. You want to make sure you keep your ratios in check! Let me know how it turns out!