

I recently hosted a virtual scavenger hunt, and one of the items I had on their list to find was a July 4th wreath.
My client was reviewing the list before the event and focused in on it, “Really, that’s a thing? Who even has that?!”
“Um… I do?” I replied, cautiously confident that it wasn’t the trickiest item we asked them to find.
But really. I know that my people have July 4th wreaths. I mean, if you can order one on Amazon, you know that it’s nearly mainstream. Is it just a Southern thing to always have a holiday door wreath greeting your guests as they walk up to your house? I think not! I will also wager a bet that the people who adorn their doors to fit the holiday are likely some of the most welcoming on the block.
And while I’m being completely honest, the whole reason for this craft is that my OG July 4th wreath is a casualty of my recent obsession of reorganizing and cleaning out the attic. I had to make another until it’s relocated because #nonakeddoors. There’s at least one of you that is nodding in agreement with me right now.
This is a SUPER simple wreath. I ordered some of the supplies online, used ribbon scraps and supplies I had on hand, and made a fast dash into the craft store for the rest (but I could have ordered if I knew what I wanted before I walked in). My supply list is below with links to where you can find them:
SUPPLIES:
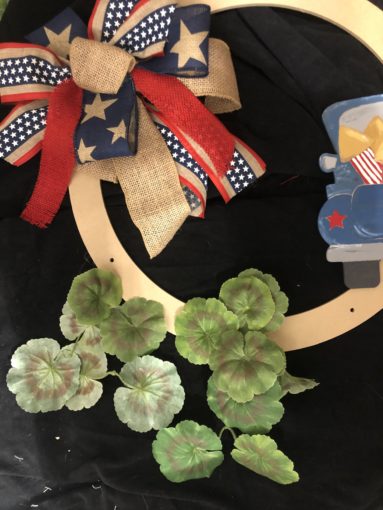
- 18-inch wood (MDF) floral wreath (Found at Michaels, order here)
- Old truck wood die cut (Find it on Etsy here)
- Floral wire, small gauge (any will do or pipe cleaners)
- Premade burlap wreath
- Patriotic ribbons
- 2 geranium stems
- Paints (I used the essential collection from Apple Barrel)
- Paint brushes
- Scissors
- Hot glue
Here are my steps:
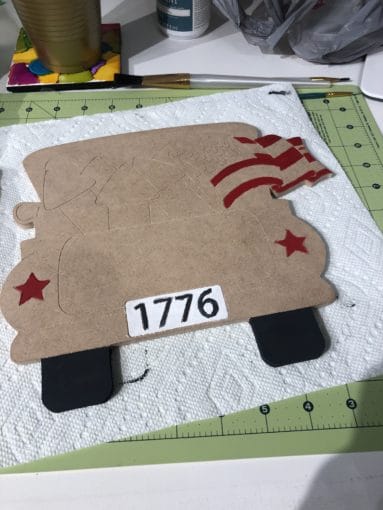
Step one: Paint the truck!
I’d recommend painting the whole truck black and then coming back with the colors. I didn’t do this, and I don’t really like the brown showing through.
- When I started this, I wasn’t sure what colors I wanted where — so I began with what I knew would be white: flag stripes, flag stars, and license plate.
- Next, I painted the black: the numbers on the plate, the wheels
- After that, I decided what would be silver/grey on a real truck: bumper, mirror and back window.
- After I painted the bumper, I added a little white to the grey for the mirror and window.
- Next, I went for the red stuff: tail lights and flag stripes
- (Then I stared at it for like 10 minutes.)
- When I got done strategizing, I painted the background of the stars dark blue.
- Then I added a smidge of white to the blue I was using and painted the back tailgate of the truck.
- After that, I added a little more white and painted the rest of the truck.
- I used brown on the flag pole.
- Next I took the gold paint and added some brown to make it darker and painted the tops of the rockets.
- For the straight part of the rocket, I used my red ad added black, painted two rockets that weren’t next to each other Next I added a smidge more black and painted the other two.
- I angled my brush a little to make stripes on two rockets, and used the other end of the brush to make polka dots on the others.
- When it was dry, I used white and black to give it all a little dimension by randomly adding to the edges of each area.
- After you’re done painting, the rest goes really quickly!
Step Two: Start Layering the Wreath
- You can either make bows, or cut corners like I did and just buy one. The one I purchased was too small so I added ribbon scraps that I had, and some loops of the new ribbon I just bought. (You can find July 4th supplies on my Amazon page here.) Once I felt like it was full enough, I hot glued it to the wreath at about the 11 o’clock position if it was a watch face.
- Next, I hot glued the truck to the wreath at about 4 o’clock. *** NOTE – my wreath is actually hanging on the inside of a door. IF I was hanging this outside in Texas, I’d have used E6000 so it didn’t melt the glue off ****
- Now, take your flower stems and gently pull all the leaves and flower bunches off from the top of the stems.
- Cut apart and trim off the excess stems from the geranium leaves so they are individual leaves.
- Now is a good time to tie your jute to the top of the wreath to make a hanger. I just looped mine through and knotted it.
- Hot glue the leaves to the wreath, covering all the wood. I tried to mix up the over under of the leaves so it wasn’t like they fanned out. You may have several left over.
- Next, cluster your geranium bunches and glue them down wherever you like. I tried to keep mine in an odd number, but honestly, I’ll probably go back and add more.
That’s it. She’s ready to hang! See more July 4th crafts here.
Pro tip: If you have some furniture felt, put a few of these on the back of the wreath so it doesn’t scratch your door when you open and close it.
Enjoy – and rest easy knowing you’re 100% prepared for your next scavenger hunt. 😉
 What’s your happy place? Crafting? Cooking? Cocktails? Party planning? Yes please! I love it all, and I’ve tried a lot. Check out my how-to’s! What should we do next?


0 Comments